Another Word Tip: Squeezing Text on a Page

I love tips that help us use MS Word more effectively. Nerino Petro at Compujurist has a great little post detailing how to take the last bit of text that appears by itself on the last page and squeeze it into the previous page. Not only does Nerino share this tip, but he also tells us how to do it in both Word 2003 and Word 2007.

I would note that you should be wary of trying this on briefs that are filed with courts that enforce strict page limits and font sizes. Word adjusts the font sizes to repaginate the document.

If you need to solve this problem, jump over to the post and see the details. I will give you a hint. The Print Preview feature plays an important role.

This is Not a Metadata Problem

I have spoken on multiple occasions to attorneys about the dangers of metadata. I have found that many attorneys are not aware of the problem and do not know how to follow simple steps to manage metadata.

I was completely stunned, however, by this post which describes a business plan that was submitted to a venture capitalist with all of the tracked changes and comments intact. This is not a situation in which someone used a metadata viewer to mine the document for unscrubbed changes. No, this is one where the author never bothered to accept the changes and they they appeared when the document was opened. Some of my favorite comments:

“When you talk through this point on your slides, make Chanukah jokes, he is Jewish and will get them”

“I’d delete this section since we don’t have these features on the roadmap and haven’t figured out how to code this unless you believe the investors won’t catch this.”

“VCs are typically stupid when it comes to this section so be prepared for a dumb question blizzard.”

(Hat tip to mathewingram.com for the link.)

Creating Captions in Word

In my earlier series on formating in word, I mentioned that I would later post about how to easily create captions using tables. A few days ago, a reader sent me an email and reminded me that I had never gone back to that post.

Thus, here is my post on how to create captions using tables. For your reference, here is a screenshot of what the captions that I generally use look like. If your captions usually have a different look, you may have to adjust my instructions. Also, as before, I am using Word 2003. How you do things in other versions of Word may or may not differ from what I am doing.

Sample Caption

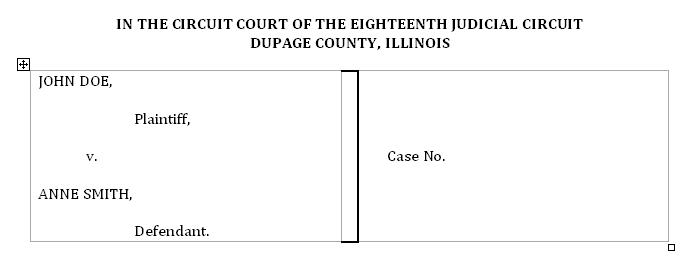
To create a caption such as this:

  1. Open a New Document
  2. Type whaever information you normally put above your caption. In my case I have the specific court information.
  3. Select Table > Insert > Table
  4. In the dialog box, select 3 for the number of columns and 1 for the number of rows
  5. You will now have a document with a table with 3 equal sized columns. Take your mouse and place it over the left border in the center column. Your cursor should turn to a small black bar with arrows pointing left and right.
  6. Hold down your left mouse button and drag the column to the right until the little triangle in your ruler is on the 3.
  7. Go to the right border in the center column. When you get the bar with the arrows, left click on the border and drag it as far to the left as it will go.
  8. You should now have a table similar to the above with large cells on the left and right and a skinny cell in the center.
  9. Click in the left cell. It is time to enter the party information. Enter the information here as you normally would. Keep in mind, however, that to use tabs within a cell, you must press CRTL + Tab. If you just press Tab, you will move to the next cell.
  10. Now go to the right cell and enter the case number information or the other information that you typically have.
  11. Once you have this, you probably want to remove most of the borders. In my case, I currently use a border that looks like a bracket (]). You can also use a simple straight line. To modify the border, place your cursor in the lower left hand corner of the table.
  12. When the cursor turns to a dark arrow pointing up and to the right, hold your left mouse button and drag your mouse to the right. This will select the entire table.
  13. Right click within the table and select Borders and Shading.
  14. In the left hand column, select None (it’s at the top) and select OK.
  15. Click somewhere outside of your table. You now have a table with no dividing lines. Let’s add one.
  16. Place your cursor at the lower left hand corner of the center column. When the black arrow appears, click your left mouse button once.
  17. Right click within that column and select Borders and Shading.
  18. In the dialog box, look at the right column, it has a representation of your column. If you click on an area, it will add a border in that area. In my case, I click on the top, the bottom, and the right side.
  19. In the center column of the dialog box, you can change the style of the line, the color of the line, and how thick the line is. I usually change the thickness of my line to 1 1/2 points.
  20. When you are done, select OK.

You now have a caption within a table. Let’s save this as a template, so that you don’t have to create it again. Click File > Save As. At the bottom of the dialog box, after Save As Type, change that to Document Template. Word should automatically take you to the folder where your templates are stored. Simply give the template a name (I cleverly chose the name Caption) and save.

You are all set to go. You can now easily create a caption just by selecting the Caption template.

Of course this is only one variation on the variety of captions that you can make. I make my caption using three columns instead of two simply because I like the spacing better.

If you wish, you can download my caption template from my Files page. Please note that this template uses Cambria as the font. For an explanation of why I use Cambria, see Ken Adams’ post It’s Time for a Typeface Change. I agree with much of when Ken has to say here, which the minor quibble that I prefer as serif rather than a sans serif font.

Formatting in Word: Help from Payne Group

Payne GroupIf you have found my posts about creating styles for numbered paragraphs in Word to be confusing, or, if you just want an easier way to do it, you should check out Numbering Assistant from Payne Group. As described by Payne Group:

The Numbering Assistant is a paragraph numbering utility that allows you to quickly add, modify and update automatic multi-level numbering schemes in Word documents. The tool contains 28 preloaded schemes provided by Payne Group. Additionally, individually tailored numbering schemes can be added upon request. The Numbering Assistant uses native Word functionality (heading styles linked to outline numbering) so you can also easily share your numbering schemes with clients and others who may not use the software. You can even add up to four multi-level schemes within the same document.

I have not used Numbering Assistant, however, I have never heard anyone complain about a Payne product. Further, I have heard plenty of good things about it.

As an added bonus, if contract drafting is your thing, Numbering Assistant incorporates the suggestions made by Ken Adams in his Manual of Style for Contract Drafting. Further information about this can be found at Ken’s site. (BTW, if you are a writing geek, you should be reading Ken’s blog).

Anyway, if you are looking for an elegant solution to fighting with Word’s numbering styles, you may want to check out Numbering Assistant.

MS Word Styles Revisited: Using Bullets Instead of Numbers

MS OfficeI received a comment to one of my Word Style posts that I want to elevate here and address. The commenter asked:

How do I set bullets? I have tinkered with this for a long time and can’t get it right. For some reason, Word just randomly changes my settings.

If you followed along with primer on creating a numbered paragraph style, you are already 90% of the way there. Follow those steps (except you should change the name of your style to something like Bullets) until you get to step 8 “Select the Numbered Tab.” There, instead of selecting the Numbered Tab:

  1. Select the Bulleted Tab
  2. Choose the bullet style you want
  3. Click customize. You can also change the bullet style here if you wish.
  4. In the top Bullet position Indent At, select your location for a bullet. For example, .5″
  5. In the Text Position section, select the location where you want the text to start after the bullet (Tab Space After) and the location where you want subsequent lines in the same bullet point to start (“Indent at”). I typically set both of these to the same position. In this case, .75″, which gives me a .25″ space between the bullet and the text.
  6. Click OK.
  7. Click OK.
  8. Click OK.

You now have a bullet point style that you can apply.

If you find this stuff interesting and want to understand how it is that Word’s numbering works, I can recommend to you the Word MVP site. You can view his info on his website. Additionally, he has a 25 page PDF that explains how Word Numbering works. I found this article absolutely invaluable in understanding Word and its styles.

How to Format a Word Document, Part 4: Applying Styles

This is part four of a four-part series on formating a Microsoft Word Document. In part 1 of this series, we tackled the problem of keeping Word from automatically formatting our numbered paragraphs. In part 2, we created a style that we can now build from to create numbered paragraphs. In part 3, we created a style for automatic paragraph numbering. As I noted before, I am using Word 2003. These tips may or may not work with other versions.

In this part of the series, we will use the two styles we created to create the substantive part of a pleading. Begin by opening Word and creating a new document. We will pretend that we already have a caption at the top (I will address, in a later post, easy ways to create captions by using tables).

You can just start typing without worrying about formating at this time. Below the break, I have included some language that you can simply cut and paste into your document.

  1. Copy the text from below the break.
  2. Place your cursor in the first paragaph.
  3. On the style toolbar, select your Normal Paragraph style.
  4. Select all of the text between the first paragraph and the Wherefore paragraph.
  5. On the style toolbar, select your Pleading Paragraph style.
  6. Place your cursor in your Wherefore paragraph.
  7. On the style toolbar, select your Normal Paragraph style.
  8. Place your cursor in the last paragraph.
  9. On the style toolbar, select your Pleading Paragraph style.
  10. You will see that your paragraph numbering continues from before. If you wish to restart your paragraph numbering, right click in that paragraph. Choose Bullets and Numbering. At the bottom of that window, select the radio button beside Restart numbering.

You now have no reason not to use automatic numbering when creating pleadings.

How to Format a Word Document, Part 3: Creating a Numbered Paragraph Style

This is the third part in a series on formating a Microsoft Word document. In part 1 of this series, we tackled the problem of keeping Word from automatically formatting our numbered paragraphs. In part 2, we created a style that we can now build from to create numbered paragraphs. As I noted before, I am using Word 2003. These tips may or may not work with other versions.

To create a style using numbered paragraphs, we will build upon the style we created in part 2, our Normal Paragraph.

  1. Select Format > Styles and Formating.
  2. In the Styles and Formatting Pane, click on New Style.
  3. Give your style a name. I call my style Pleading Paragraph.
  4. Style type should be paragraph.
  5. Style based on. Here use the style we just created, Normal Paragraph. This means that you are starting with the formatting that is in Normal Paragraph.
  6. Style for following paragraph. Make sure this is set to Pleading Paragraph.
  7. Click the add to template box before you forget to do so.

These next set of instructions may seem like they are complicated. However, if you just follow along step by step, you will do fine.

  1. Just below the add to template box, click on Format. Select Paragraph.
  2. In the indentation section, select First Line.
  3. For By, choose 0.5″
  4. Click OK.
  5. Click Format again. This time select Tabs.
  6. Tab stop position. Add 1″. Click OK.
  7. Click Format again. This time select Numbering.
  8. Click the Numbered tab.
  9. Select one with numbers.
  10. Click customize in the bottom right.
  11. Your number style should be 1, 2, 3, …
  12. Start at: 1
  13. Number position: Left.
  14. Aligned at 0.5″
  15. Tab space after: 1″
  16. Indent at 0″
  17. Click OK
  18. Click OK

You now have a style that allows you to create numbered paragraphs. Just as with the style yesterday, you can apply the style simply by clicking within the paragraph and selecting Pleading Paragraph.

In part 4 of the series, we will use a combination of the styles we have created to draft part of a pleading.

How to Format a Word Document, Part 2: Creating a Style

In part 1 of this series, we tackled the problem of keeping Word from automatically formatting our numbered paragraphs. In this installment, we create a style that we can build from to create numbered paragraphs.

Step one of using styles is to have them accessible. If you know how to modify your toolbar, do so to include style on your active toolbar. If you are not sure how to modify your toolbar, just enable the Formating toolbar. It has the style selection on it.

You enable the Formatting toolbar by right clicking on your toolbar and choosing formatting. The style section is the drop down box that currently reads “Normal.”

By default, Word documents format paragraphs using the Normal style. This really does not work for most legal writing. Thus, I create a style I use for my documents that reflects the characteristics that I like. This includes formatting options such as full justification and double spacing.

You can modify the Normal style if you wish to do so. I do not recommend it however. Most of the other built-in styles are based upon it.

Before we create our numbered paragraph style, let’s first create our normal style.

  1. Select Format > Styles and Formating. The Styles and Formatting bar will appear to your right.
  2. Select New Style.
  3. Give your style a name. I call my normal style Normal Paragraph. You can call yours whatever you like.
  4. For style type. Leave it on paragraph.
  5. Style based on. Leave this on normal.
  6. Style for following paragraph. For this, select the name of the style that you are creating now. This means that when you hit enter, the new paragraph will be formatted just like the paragraph you just typed.
  7. In the next section you can change your font, its size, its color, etc. You can change this if you wish.
  8. Below the font name, are the choices for justification. Choose either left justification (first choice) or full justification (fourth choice) according to your preference.
  9. Next (below the font size) is your choice for single space, one and a half space, or double space. I choose double space here.
  10. The remaining choices deal with space between paragraphs and full paragraph indenting. Neither are something we want to deal with now.
  11. Near the bottom, select Add to Template. It is very important that you check this box. If you do not, this style appears only in the document you are working in. If you select this box, the style appears in the template of the document you are working it (usually Normal.dot). This means it will be available to you every time that you create a new document.
  12. Click OK.

You now have a style named Normal Paragraph. To apply this style, simply click anywhere within a paragraph and select the style name. That paragraph will automatically be formatted as you set forth.

Tomorrow in part 3 of this series, we will use the Normal Paragraph to create a numbered paragraph for our pleadings.

How to Format a Word Document, Part 1: Unchecking Default Settings

All too often I receive a pleading from someone that has numbered paragraphs that have all of the text indented. I am pretty sure that the person creating the document does not really want it this way. However, is the default manner in which Word formats numbered paragraphs.

Don’t let Microsoft hold your documents hostage. Seize control and format the documents the way that you want.

The first thing that you should do is Open Word then select Tools > AutoCorrect Options. Select the Tab labeled AutoFormat As You Type. That tab has three sections to it: Replace as you type, Apply as you type, and Automatically as you type. Select or deselect whatever features you want in the first section (Replace as you type) according to your personal preferences.

In the other two sections (Apply as you type and Automatically as you type) make sure that none of the boxes have check marks in them. Then select the tab titled AutoFormat. In the Apply section, make sure that there is no check mark beside Built-in Heading styles, List styles, or Automatic Bulleted Lists. After doing so, click OK.

Making sure that the above items are deselected, should keep Word from automatically formating your numbered paragraphs.

Now that we have dispensed with Word trying to screw things up, we now have to make it possible for you to create numbered paragraphs. We do that by using styles. Don’t panic. Styles are not difficult to master. We will do that in part 2 of this series.

Please note that for this series I am using Word 2003. Other versions may or may not work in the same manner.