Creating Captions in Word

In my earlier series on formating in word, I mentioned that I would later post about how to easily create captions using tables. A few days ago, a reader sent me an email and reminded me that I had never gone back to that post.

Thus, here is my post on how to create captions using tables. For your reference, here is a screenshot of what the captions that I generally use look like. If your captions usually have a different look, you may have to adjust my instructions. Also, as before, I am using Word 2003. How you do things in other versions of Word may or may not differ from what I am doing.

Sample Caption

To create a caption such as this:

  1. Open a New Document
  2. Type whaever information you normally put above your caption. In my case I have the specific court information.
  3. Select Table > Insert > Table
  4. In the dialog box, select 3 for the number of columns and 1 for the number of rows
  5. You will now have a document with a table with 3 equal sized columns. Take your mouse and place it over the left border in the center column. Your cursor should turn to a small black bar with arrows pointing left and right.
  6. Hold down your left mouse button and drag the column to the right until the little triangle in your ruler is on the 3.
  7. Go to the right border in the center column. When you get the bar with the arrows, left click on the border and drag it as far to the left as it will go.
  8. You should now have a table similar to the above with large cells on the left and right and a skinny cell in the center.
  9. Click in the left cell. It is time to enter the party information. Enter the information here as you normally would. Keep in mind, however, that to use tabs within a cell, you must press CRTL + Tab. If you just press Tab, you will move to the next cell.
  10. Now go to the right cell and enter the case number information or the other information that you typically have.
  11. Once you have this, you probably want to remove most of the borders. In my case, I currently use a border that looks like a bracket (]). You can also use a simple straight line. To modify the border, place your cursor in the lower left hand corner of the table.
  12. When the cursor turns to a dark arrow pointing up and to the right, hold your left mouse button and drag your mouse to the right. This will select the entire table.
  13. Right click within the table and select Borders and Shading.
  14. In the left hand column, select None (it’s at the top) and select OK.
  15. Click somewhere outside of your table. You now have a table with no dividing lines. Let’s add one.
  16. Place your cursor at the lower left hand corner of the center column. When the black arrow appears, click your left mouse button once.
  17. Right click within that column and select Borders and Shading.
  18. In the dialog box, look at the right column, it has a representation of your column. If you click on an area, it will add a border in that area. In my case, I click on the top, the bottom, and the right side.
  19. In the center column of the dialog box, you can change the style of the line, the color of the line, and how thick the line is. I usually change the thickness of my line to 1 1/2 points.
  20. When you are done, select OK.

You now have a caption within a table. Let’s save this as a template, so that you don’t have to create it again. Click File > Save As. At the bottom of the dialog box, after Save As Type, change that to Document Template. Word should automatically take you to the folder where your templates are stored. Simply give the template a name (I cleverly chose the name Caption) and save.

You are all set to go. You can now easily create a caption just by selecting the Caption template.

Of course this is only one variation on the variety of captions that you can make. I make my caption using three columns instead of two simply because I like the spacing better.

If you wish, you can download my caption template from my Files page. Please note that this template uses Cambria as the font. For an explanation of why I use Cambria, see Ken Adams’ post It’s Time for a Typeface Change. I agree with much of when Ken has to say here, which the minor quibble that I prefer as serif rather than a sans serif font.

Printing Windows Directories

One of the (many) inexplicable shortcomings with Windows is that it fails to include an easy way to print a list of files in directory tree. Several utilities have been written to provide this functionality. Thescirhtmle programs include Directory Printer and Karen’s Directory Printer. These programs work well and I usually have one or the other installed on any machine that I use.

Recently, however, I have discovered a new directory printing utility: dirhtml. The cool thing about this program is that it not only creates a directory list, but it also creates an html link to the particular file.

If you want the ability to print a directory tree, you may want to check this utility out.

Scrolling with MoGo

Last year I bought my wife a MoGo Mouse. The great thing about this mouse is that it stores and recharges in your laptopsMoGo Mouse PC card slot. This means that you always have your mouse with your laptop. Plus, it is always charged. The MoGo connects to your laptop via Bluetooth. Thus, if you have Bluetooth built in your laptop, you can easily carry and use the mouse without adding any extra bulk to what you carry.

The only drawback to the mouse is that it does not contain a scrollwheel (the new version contains a scroll wheel). Once you get used to using a scroll wheel, it is difficult to use a mouse without one. Thus, despite having this cool, easily transportable mouse, my wife wasn’t using it much.

Fortunately, Jeff Beard at LawTech Guru has come to my rescue. He has posted a portable mouse roundup that is very informative. If fact, if you are in the market for a portable mouse, I recommend that you read his post. In his post he mentions that MoGo now offers scrolling software for its mouse.

Following the link, I find that, sure enough, you can download the software from MoGo that allows you to scroll simply by holding down your left mouse button and dragging your mouse. It’s certainly not as elegant as a scroll wheel, but it is definitely better than nothing. As Jeff points out, MoGo’s software is old software revived by a MoGo user looking for a solution to the absence of a scroll wheel.

Date Calculators

In the legal world, we often have to calculate the number of days between two dates. In my practice, I run into this frequently in determining postjudgment interest and calculating real estate tax prorations.

I use a custom spreadsheet created by my mathematically inclined wife. TechnoEsq offers some other solutions. In his post, he talks about a WordPerfect macro that you can download. If you are not using WordPerfect, he also points you to TimeAndDate.com, which will perform these calculations for you as well. He also points out that if you are a Mac user running Leopard, you can create a widget out of the TimeAndDate webpage.

The point is that there are a variety of resources available. You should never be manually calculating these dates.

100 Financial Calculators

I often tell people that I married someone with an advanced degree in mathematics so thCalculatorat I would not have to do math anymore. For those of you who are not quite as lucky as I am, Bootstrapper has a list of 100 Financial Calculators to help you calculate everything from your profit margin to your effective tax rate. This is a great resource to bookmark and keep close at hand in the event you need to perform a quick calculation.

Hat tip to Build A Solo Practice for the link.

Another Example of Authentication Causing Problems for Honest Users

I have no issues or problems with publishers taking reasonable steps to ensure that their software is not pirated by someone. What I do have a problem with, however, is when those publishers implement “authentication” schemes that cause problems for the legal users but do nothing to stop the real threat of large scale pirates.

APC Magazine  has an article detailing how the author’s upgrading of a device driverPirate resulted in his copy of Windows Vista being deactivated. After a telephone call, the author was able to get the software reactivated. However, it is simply ridiculous that he had to jump through those hoops simply because he upgrade some device drivers.

This would annoying, but probably acceptable, if the activation process actually prevented people from pirating the software. That, however, is clearly not the case.

As the author explained:

So pirates haven’t been slowed down at all, and the rest of us — the legitimate purchasers — are left to live with Windows Activation. You really need to ask the question – who’s benefiting here? Certainly not users, and given the amount of discontent this is likely to cause, arguably not Microsoft either.

In its attempts to combat piracy, Microsoft has created a system which doesn’t focus on the problem correctly. After all, how do you define piracy? At its most basic level, piracy occurs when you install software on a machine when you aren’t licensed to do so. But the Windows Activation model isn’t designed to address this particular problem – as far as Windows Activation is concerned, there’s no difference between someone who tries to image two machines with the same activated version of Windows, and a legitimate user who wants to upgrade their system.

If you buy a retail version of Vista, as long as you’re not breaking the terms of the license, then surely it’s none of Microsoft’s business what you do with that software. Legitimate users shouldn’t be monitored and inconvenienced to this extent.

Microsoft is not the only culprit here. Many software companies use some form of activation to authenticate their software. The problem, however, is that most of these methods only annoy the people who paid money to purchase the program and do nothing to stop the pirates.

Maybe someday, a publisher will realize that there is an advantage to not treating your customers like thieves.

Undocumented Firefox Tips

PC WorldPC World gives us an article with 15 undocumented Firefox tips. If you use Firefox (and you should), this article is definitelyFirefox worth a read. The article contains tips things such as keyboard shortcuts, easy searching of pages, purging your private information, and optimizing Firefox for broadband.

The tips are well written, easy to understand, and even easier to implement. Check out the article and start improving your browsing experience immediately.

SpeedFiler Update

I posted about SpeedFiler the other day. In my post, I estimated that SpeedFiler correctly guesses the proper folder about 90% of the time. I was playing with the program today and discovered that it actually keeps track of such stats. It turns out that SpeedFiler guess the correct folder 85% of the time. That 85% is through 750 messages that it has filed.

Favorites: SpeedFiler

I have found a new software program that I absolutely love. It is SpeedFiler from Claritude Software. SpeedFiler is an add-in for Microsoft Outlook. According to the website, it is compatible with both Outlook 2003 and 2007. SpeedFiler allows you to completely and easily organize your inbox and folders in Microsoft Outlook.

I have always been pretty good about keeping my emails organized in folders. However, the bane of my existence has always been my sent folder. It always took too much time and effort to try to organize my sent messages and put them in folders. SpeedFiler has solved this problem for me.

When you send an email in Outlook, SpeedFiler pops up a window and asks you where you want the sent message filed. When it does this, it suggests a folder that it thinks might be appropriate. Based upon my use for almost a month, this “guess” appears to be accurate about 90% of the time. If the suggestion is wrong, you simply select the correct folder. However, rather than wading through your folder tree, you simply start typing the name of the folder. SpeedFiler then suggests the folder to you. Thus, in usually just a couple of keystrokes you can file the sent message in the proper folder.

Speedfiler also has a selection that will send the message and then delete it from the sent folder. Finally, another great feature about the sending and filing aspect is that, if you are replying to an email, you have the option of filing the original email at the same time you file your response.

In terms of managing your inbox, the filing system works just as well. SpeedFiler adds a toolbar to Outlook that allows you to file emails with just one click. As described above, the suggested folder is right the vast majority of the time. If that is not the correct folder, however, a few key strokes or mouse clicks will quickly get the email filed.

I love products that aim to do only one thing and then do it well. SpeedFiler does its one thing (organizing my emails) exceptionally well. I have rarely used a program that works so well, so easily, and so intuitively. If you use Outlook as your email program, I encourage you to download a trial version today. Try it for 30 days and you will be amazed at how much easier it is to handle and file your email. I wished that I had found this program years ago.

The professional version of the program (which includes the one-click filing and the intelligent folder suggestions) is $39.95. Further, the license reasonably allows you to use the program on multiple computers as long as you are the only user.

Outlook on Your Desktop

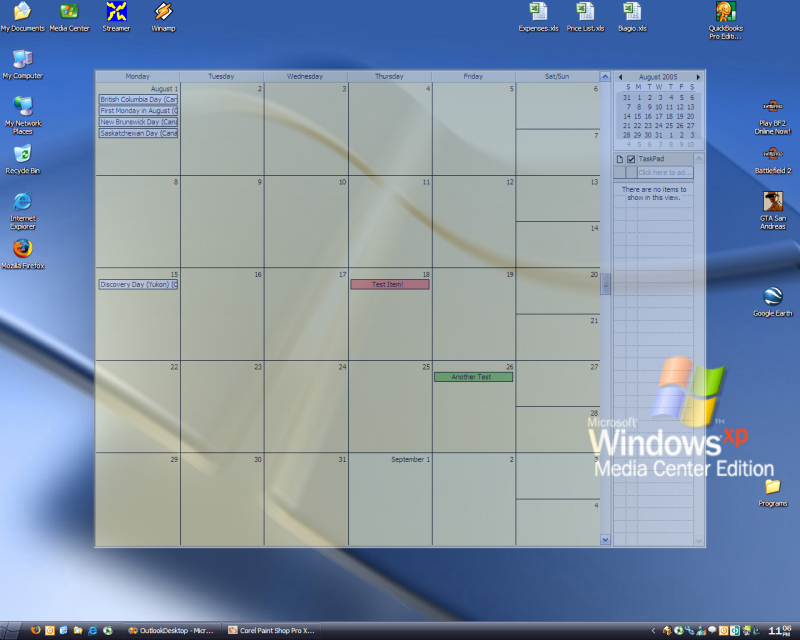
I recently ran across this neat little utility. It’s called Outlook on the Desktop and its function is to put Outlook on your desktop in a semitransparent manner. The really neat thing is that it is fully editable in this form.

The part I love is that the developer said that he created it because it was something that his girlfriend wanted.

Outlook on Desktop