In my earlier series on formating in word, I mentioned that I would later post about how to easily create captions using tables. A few days ago, a reader sent me an email and reminded me that I had never gone back to that post.
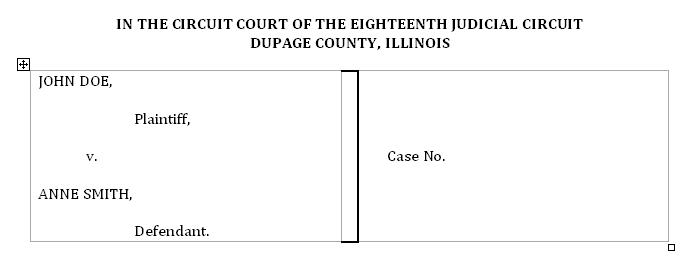
Thus, here is my post on how to create captions using tables. For your reference, here is a screenshot of what the captions that I generally use look like. If your captions usually have a different look, you may have to adjust my instructions. Also, as before, I am using Word 2003. How you do things in other versions of Word may or may not differ from what I am doing.
To create a caption such as this:
- Open a New Document
- Type whaever information you normally put above your caption. In my case I have the specific court information.
- Select Table > Insert > Table
- In the dialog box, select 3 for the number of columns and 1 for the number of rows
- You will now have a document with a table with 3 equal sized columns. Take your mouse and place it over the left border in the center column. Your cursor should turn to a small black bar with arrows pointing left and right.
- Hold down your left mouse button and drag the column to the right until the little triangle in your ruler is on the 3.
- Go to the right border in the center column. When you get the bar with the arrows, left click on the border and drag it as far to the left as it will go.
- You should now have a table similar to the above with large cells on the left and right and a skinny cell in the center.
- Click in the left cell. It is time to enter the party information. Enter the information here as you normally would. Keep in mind, however, that to use tabs within a cell, you must press CRTL + Tab. If you just press Tab, you will move to the next cell.
- Now go to the right cell and enter the case number information or the other information that you typically have.
- Once you have this, you probably want to remove most of the borders. In my case, I currently use a border that looks like a bracket (]). You can also use a simple straight line. To modify the border, place your cursor in the lower left hand corner of the table.
- When the cursor turns to a dark arrow pointing up and to the right, hold your left mouse button and drag your mouse to the right. This will select the entire table.
- Right click within the table and select Borders and Shading.
- In the left hand column, select None (it’s at the top) and select OK.
- Click somewhere outside of your table. You now have a table with no dividing lines. Let’s add one.
- Place your cursor at the lower left hand corner of the center column. When the black arrow appears, click your left mouse button once.
- Right click within that column and select Borders and Shading.
- In the dialog box, look at the right column, it has a representation of your column. If you click on an area, it will add a border in that area. In my case, I click on the top, the bottom, and the right side.
- In the center column of the dialog box, you can change the style of the line, the color of the line, and how thick the line is. I usually change the thickness of my line to 1 1/2 points.
- When you are done, select OK.
You now have a caption within a table. Let’s save this as a template, so that you don’t have to create it again. Click File > Save As. At the bottom of the dialog box, after Save As Type, change that to Document Template. Word should automatically take you to the folder where your templates are stored. Simply give the template a name (I cleverly chose the name Caption) and save.
You are all set to go. You can now easily create a caption just by selecting the Caption template.
Of course this is only one variation on the variety of captions that you can make. I make my caption using three columns instead of two simply because I like the spacing better.
If you wish, you can download my caption template from my Files page. Please note that this template uses Cambria as the font. For an explanation of why I use Cambria, see Ken Adams’ post It’s Time for a Typeface Change. I agree with much of when Ken has to say here, which the minor quibble that I prefer as serif rather than a sans serif font.

